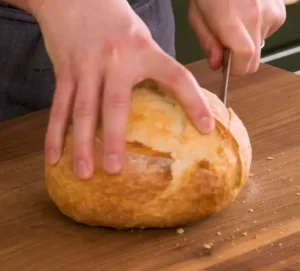
Rustic No-Knead Bread Recipe
This no-knead artisan bread recipe is an easy, foolproof way to create crusty, bakery-style bread at home with no kneading and very little hands-on time.
|
Prep Time: |
Cook Time: |
Total Time: |
|
Servings: |
Yield: |
Why This No-Knead Bread Works Every Time
No-knead bread has become a favorite among home bakers because it delivers bakery-quality results with almost no effort. There’s no kneading, no special skills, and no complicated techniques.
The dough comes together in minutes, rests overnight, and bakes into a loaf with a crispy crust and soft, airy inside. If you’re new to bread baking, this is the perfect place to start.
Understanding the No-Knead Bread Method
No-knead bread is a rustic-style loaf made by mixing simple ingredients and allowing the dough to ferment slowly over time instead of kneading it by hand or mixer.
The long resting period naturally develops gluten, giving the bread structure and flavor without physical effort.The dough is typically baked in a hot Dutch oven, which traps steam and creates a beautifully crusty exterior.
How No-Knead Bread Became a Home-Baking Staple
The no-knead bread method gained worldwide attention in the early 2000s when professional bakers demonstrated that time could replace kneading. This slow-fermentation technique transformed home baking by proving that great bread didn’t require advanced skills or equipment.
Since then, countless variations have appeared, but the core method remains the same: simple ingredients, patience, and high heat.
Simple Ingredients That Create Artisan Texture
One of the biggest reasons no-knead bread is so popular is its short ingredient list. Each ingredient plays an important role:
- Flour: Provides structure and texture
- Yeast: Helps the dough rise slowly and develop flavor
- Salt: Enhances taste and strengthens the dough
- Water: Activates the yeast and hydrates the flour
- Olive oil (optional): Adds a slightly softer crumb
Because the ingredient list is minimal, using good-quality flour and fresh yeast makes a noticeable difference.

From Mixing to Baking: The No-Knead Process Explained
The process is simple and forgiving. First, the ingredients are mixed until a rough, sticky dough forms. The dough is then covered and left to rest at room temperature for 12–18 hours.
During this time, fermentation creates flavor and structure. Once risen, the dough is gently shaped, placed on parchment paper, and baked in a preheated Dutch oven until golden and crisp.
Method
Mix the dough:
In a large mixing bowl, combine flour, salt, and yeast. Add the water (and olive oil if using) and stir until a rough, sticky dough forms. Make sure no dry flour remains.
Rest overnight:
Cover the bowl loosely with plastic wrap or a clean kitchen towel. Let the dough rest at room temperature for 12–18 hours, until doubled in size with bubbles on the surface.
Prep the oven and dough:
Place a Dutch oven with its lid inside the oven and preheat to 450°F (232°C) for 25–30 minutes. Meanwhile, turn the dough out onto a lightly floured surface and gently shape it into a round. Place on parchment paper and cover loosely.
Bake:
Carefully transfer the dough (with parchment) into the hot Dutch oven. Cover and bake for 30 minutes. Remove the lid and bake for another 10–15 minutes until the crust is deep golden and crisp.
Cool & serve:
Remove bread from the Dutch oven and transfer to a wire rack. Let cool for at least 30–45 minutes before slicing. Serve warm or at room temperature.
Variations and Add-Ins to Try
No-knead bread is an excellent base recipe that can be customized easily. Popular additions include herbs, seeds, whole wheat flour, or even roasted garlic. You can also adjust the flour blend or add flavorings to suit different meals. These small changes keep the recipe exciting while maintaining the same easy method.
Best Ways to Serve No-Knead Bread
This bread pairs beautifully with soups, stews, and pasta dishes. It’s also great for dipping into olive oil, serving with cheese boards, or making simple sandwiches. Toasted slices work well for breakfast with butter, jam, or avocado. Its neutral flavor makes it incredibly versatile.
No-Knead Bread Equipment
You don’t need much equipment to make this recipe, which is another reason it’s beginner-friendly. A large mixing bowl, a spoon or spatula, parchment paper, and a Dutch oven are all you need. The Dutch oven is especially important because it traps steam, helping the bread rise properly and form a crisp crust.
Secrets for Bakery-Style Results at Home
Sticky dough is normal and expected in no-knead bread. Lightly flour your hands and work surface, but avoid adding too much flour to the dough itself. Use gentle folding motions rather than pressing or kneading. If the dough sticks, pause and dust your hands again instead of forcing it.
Overnight No-Knead Bread Timeline
Follow this simple timeline to see exactly how your no-knead bread comes together from start to finish, minimal hands-on time, maximum flavor!
| Stage | Time Required | What Happens |
|---|---|---|
| Day 1 (Evening) | 5–10 minutes | Ingredients are mixed to form a rough, sticky dough. No kneading is needed. |
| Overnight Rest | 12–18 hours | Dough ferments at room temperature, developing flavor and structure naturally. |
| Day 2 (Baking Prep & Bake) | About 1 hour | Dough is gently shaped, oven and Dutch oven are preheated, and bread is baked. |
| Cooling Time | 30–45 minutes | Bread rests after baking so the crumb sets properly before slicing. |
Why this schedule works:
Most of the time is hands-off, making this recipe ideal for busy schedules while still delivering bakery-style results.

Rustic No-Knead Bread Recipe
Ingredients
- 3¼ cups all-purpose flour spooned and leveled
- 1¾ teaspoons fine salt
- ½ teaspoon instant or active dry yeast
- 1½ cups room-temperature water
- 1 teaspoon olive oil optional, for softer crumb
- Extra flour for shaping
Instructions
- Mix the dough in a large bowl, combine the flour, salt, and yeast. Stir until evenly distributed.

- Pour in the water (and olive oil if using) and mix with a spoon until no dry flour remains. The dough will look sticky, rough, and uneven, this is exactly what you want.

- Cover the bowl loosely with plastic wrap or a clean kitchen towel.

- Let the dough rest at room temperature for 12 to 18 hours, until it has doubled in size and the surface is dotted with bubbles.
- Shape the dough and Lightly flour your work surface and hands. Turn the dough out gently, do not punch it down.

- Fold the edges inward a few times to form a loose round. Avoid overhandling; the dough should stay airy.
- Place the dough seam-side down onto a piece of parchment paper. Dust lightly with flour and loosely cover while the oven heats.
- Preheat the oven & Dutch oven to 450°F (232°C) for at least 25 minutes to bake the bread.

- Carefully remove the hot Dutch oven. Using the parchment paper, lower the dough into the pot.
- Remove the lid and bake for another 10–15 minutes, until the crust turns deep golden brown and sounds hollow when tapped.

- Transfer the bread to a wire rack and let it cool for at least 30–45 minutes before slicing. This helps the crumb set properly.